Installing Cyanogenmod 12.1 on the Amazon Fire 2015

amazon-fire

Warning: Root and flash your device at your own risk. I am not responsible when your device becomes unusable.

An Amazon Fire 7″ (2015 release) tablet recently came into my possession. The hardware is good considering the very low price. But I couldn’t stand FireOS, Amazon’s version of Android. It’s uglier. It has fewer features than stock Android. The Amazon Appstore has a worse selection of apps compared to Google Play. And every app on the tablet seems to try to sell you something.

I expelled Amazon from the tablet and installed a fully featured version of Android. It now runs like a dream.

You can follow along.

Required:

  • Amazon Fire with FireOS 5.1.1 or less
  • microSD card

Step 1: Enable ADB

  1. From your Fire, open Settings
  2. Tap Device Options
  3. Tap the device Serial Number seven times to reveal the Developer Options menu
  4. Tap Developer Options
  5. Set Enable ADB to on

Step 2: Root your tablet using SuperTool

  1. From your computer, download SuperTool from
    http://forum.xda-developers.com/amazon-fire/development/amazon-fire-5th-gen-supertool-root-t3272695
  2. Run the SuperTool option: ADB and Fastboot Driver Install Plus Test
  3. Run the SuperTool option: Root your Amazon Fire 5th gen
  4. Run the SuperTool option: Install Google Play store

Step 3: Install FlashFire

  1. At the time for writing, FlashFire is in beta. You can signup for the beta using the following link. It may take 10 minutes after joining before you can install the app.
    https://play.google.com/apps/testing/eu.chainfire.flash
  2. Install [root] FlashFire by Chainfire from the Play Store

Step 4: Download Cyanogenmod 12.1

Download Cyanogenmod to your microSD card
http://forum.xda-developers.com/amazon-fire/orig-development/rom-cm-12-1-2015-11-15-t3249416

Step 5: Download SuperSU

Download Cyanogenmod to your microSD card
http://download.chainfire.eu/supersu-stable

Step 6: Download Google Apps

Download Google Apps to your microSD card
http://opengapps.org/
Platform: ARM
Android: 5.1
Variant: Nano

Step 7: Flash Cyanogenmod, SuperSU, and Google Apps

  1. Launch FlashFire.
  2. Click the red (+) button and choose Wipe.
    Ensure System data, 3rd party apps and Dalvik cache are CHECKED.
  3. Click the red (+) button and choose ‘Flash ZIP/OTA’.
    Navigate to and choose the Cyanogenmod zip.
    Ensure Auto-mount and Mount /system read/write are UNCHECKED.
  4. Click the red (+) button and choose ‘Flash ZIP/OTA’.
    Navigate to and choose the SuperSU zip.
    Ensure Auto-mount is UNCHECKED.
    Ensure Mount /system read/write is CHECKED.
  5. Click the red (+) button and choose ‘Flash ZIP/OTA’.
    Navigate to and choose the Google Apps zip.
    Ensure Auto-mount is UNCHECKED.
    Ensure Mount /system read/write is CHECKED.
  6. Move “Wipe” to the Top of the order.
  7. Press the big FLASH button.
  8. Wait for reboot.

Done

At this point you should be running Cyanogenmod 12.1 with SuperSU for root and Google Apps.

Recovery

You can easily return to stock FireOS. You may need to do this if something goes wrong when installing Cyanogenmod. Or maybe you like FireOS better.

  1. Download FireOS 5.1.1
    http://kindle-fire-updates.s3.amazonaws.com/8KNSnW7JKg3F3z46hiZnfi9TGa/update-kindle-global-37.5.4.1_user_541112720.bin
  2. Download and run ADB Installer
    http://forum.xda-developers.com/showthread.php?p=4891511
  3. Boot Fire into recovery: hold volume down button & power button at the same time. If it boots to fastboot mode, use the other volume button.
  4. Select Sideload
  5. Connect to PC via usb cable
  6. Open a command prompt with the path set to the folder where you downloaded FireOS
  7. Run this command to load the firmware:
    adb sideload update-kindle-global-37.5.4.1_user_541112720.bin
  8. Once the recovery options come back, wipe data and cache.
  9. Select reboot
  10. For more help, see
    http://forum.xda-developers.com/amazon-fire/general/unbrick-amazon-fire-7in-2015-5th-gen-t3285294

Generic CSV Writer

What follows is a generic class for generating CSV files.

Usage

    CsvWriter<MyObject> writer = new CsvWriter<MyObject>();
    writer.Header = true;
    writer.AddColumn("Id", x => x.Id.ToString());
    writer.AddColumn("Name", x => x.Name);
    writer.AddColumn("Price", x => x.Price.ToString());
    writer.AddColumn("Guid", x => x.Guid);
    writer.AddColumn("Description", x => x.Description);
    writer.AddColumn("Url", x => x.Url);

    IEnumerable<MyObject> objects = Load();
    string csv = writer.WriteToString(objects);
    File.WriteAllText("objects.csv", csv);

Classes

    class CsvWriter<T>
    {
        private readonly List<CsvColumn<T>> _columns = new List<CsvColumn<T>>();

        public bool Header { get; set; }
        public bool QuoteAll { get; set; }
        public IEnumerable<CsvColumn<T>> Columns { get { return _columns; } }

        public void AddColumn(string name, Func<T, string> value)
        {
            if (name == null) throw new ArgumentNullException("name");
            if (value == null) throw new ArgumentNullException("value");

            foreach (CsvColumn<T> column in _columns)
                if (column.Name == name)
                    throw new Exception("Column with same name already added.");

            _columns.Add(new CsvColumn<T>(name, value));
        }

        public string WriteToString(IEnumerable<T> items)
        {
            if (items == null) throw new ArgumentNullException("items");

            StringWriter writer = new StringWriter();
            WriteToStream(writer, items);
            return writer.ToString();
        }

        public void WriteToStream(TextWriter stream, IEnumerable<T> items)
        {
            if (stream == null) throw new ArgumentNullException("stream");
            if (items == null) throw new ArgumentNullException("items");

            if (Header)
                WriteHeader(stream);

            foreach (T item in items)
                WriteRow(stream, item);
        }

        private void WriteHeader(TextWriter stream)
        {
            bool first = true;
            foreach (CsvColumn<T> column in _columns)
            {
                if (first)
                    first = false;
                else
                    stream.Write(',');

                WriteValue(stream, column.Name);
            }
            stream.Write('\n');
        }

        private void WriteRow(TextWriter stream, T item)
        {
            if (item == null) return;

            bool first = true;
            foreach (CsvColumn<T> column in _columns)
            {
                if (first)
                    first = false;
                else
                    stream.Write(',');

                WriteValue(stream, column.Value(item));
            }
            stream.Write('\n');
        }

        private void WriteValue(TextWriter stream, string value)
        {
            if (value == null) return;

            if (QuoteAll || ContainsAny(value, '\"', ',', '\x0A', '\x0D'))
            {
                stream.Write("\"");
                stream.Write(value.Replace("\"", "\"\""));
                stream.Write("\"");
            }
            else
            {
                stream.Write(value);
            }
        }

        private static bool ContainsAny(string value, params char[] characters)
        {
            return value.IndexOfAny(characters) != -1;
        }
    }

    class CsvColumn<T>
    {
        public string Name { get; private set; }
        public Func<T, string> Value { get; private set; }

        public CsvColumn(string name, Func<T, string> value)
        {
            if (name == null) throw new ArgumentNullException("name");
            if (value == null) throw new ArgumentNullException("value");

            Name = name;
            Value = value;
        }
    }


Auto ToString()

I wanted to print the contents of some objects, for debugging purposes. One option was to override my Class’s ToString method and simply use Console.WriteLine(myObject). I do this on a few classes, and suddenly I have to maintain all these ToString methods whenever I change their properties or fields.

All that extra work, just for some debug statements? I think not – I’d rather the computer do the work for me. After all, it always knows what properties my objects have. So I wrote a method for automatically generating a “pretty” snapshot of an object’s state. C# code follows.

Console.WriteLine(AutoString(DBNull.Value));
// DBNull { }

Console.WriteLine(AutoString("A String", true));
// String
// {
//   FirstChar:      A
//   Length:         8
//   m_firstChar:    A
//   m_stringLength: 8
// }

Console.WriteLine(AutoString(new Customer
{
    Id = 12,
    Name = "Smith",
    Address = new Address
    {
        City = "Springfield"
    }
}));
// Customer
// {
//   Address: TestApp.Address
//   Id:      12
//   Name:    Smith
//   Region:
// }

public static string AutoString(object obj, bool includeNonPublic = false)
{
    if (obj == null) return "null";

    Type type = obj.GetType();

    BindingFlags flags = BindingFlags.Instance | BindingFlags.Public;
    if (includeNonPublic)
        flags = flags | BindingFlags.NonPublic;

    List<MemberInfo> members = type.GetProperties(flags)
                                    .Where(property => property.GetIndexParameters().Length == 0)
                                    .Cast<MemberInfo>()
                                    .Concat(type.GetFields(flags))
                                    .OrderBy(member => member.Name)
                                    .ToList();

    StringBuilder sb = new StringBuilder();

    if (members.Count > 0)
    {
        sb.AppendLine(type.Name);
        sb.AppendLine("{");

        int longest = members.Max(m => m.Name.Length);
        foreach (MemberInfo member in members)
        {
            sb.Append("  ");
            sb.Append(member.Name);
            sb.Append(":");
            sb.Append(' ', longest - member.Name.Length + 1);
            sb.Append(GetValue(member as PropertyInfo, obj));
            sb.Append(GetValue(member as FieldInfo, obj));
            sb.AppendLine();
        }

        sb.Append("}");
    }
    else
    {
        sb.Append(type.Name);
        sb.Append(" { }");
    }

    return sb.ToString();
}

private static string GetValue(PropertyInfo property, object instance)
{
    if (property == null) return null;
    var value = property.GetValue(instance, null);
    if (value == null) return null;
    return value.ToString();
}

private static string GetValue(FieldInfo field, object instance)
{
    if (field == null) return null;
    var value = field.GetValue(instance);
    if (value == null) return null;
    return value.ToString();
}

The Death of Google Wave

From Google’s blog today:

Update on Google Wave

We have always pursued innovative projects because we want to drive breakthroughs in computer science that dramatically improve our users’ lives. Last year at Google I/O, when we launched our developer preview of Google Wave, a web app for real time communication and collaboration, it set a high bar for what was possible in a web browser. We showed character-by-character live typing, and the ability to drag-and-drop files from the desktop, even “playback” the history of changes–all within a browser. Developers in the audience stood and cheered. Some even waved their laptops.

We were equally jazzed about Google Wave internally, even though we weren’t quite sure how users would respond to this radically different kind of communication. The use cases we’ve seen show the power of this technology: sharing images and other media in real time; improving spell-checking by understanding not just an individual word, but also the context of each word; and enabling third-party developers to build new tools like consumer gadgets for travel, or robots to check code.

But despite these wins, and numerous loyal fans, Wave has not seen the user adoption we would have liked. We don’t plan to continue developing Wave as a standalone product, but we will maintain the site at least through the end of the year and extend the technology for use in other Google projects. The central parts of the code, as well as the protocols that have driven many of Wave’s innovations, like drag-and-drop and character-by-character live typing, are already available as open source, so customers and partners can continue the innovation we began. In addition, we will work on tools so that users can easily “liberate” their content from Wave.

Wave has taught us a lot, and we are proud of the team for the ways in which they have pushed the boundaries of computer science. We are excited about what they will develop next as we continue to create innovations with the potential to advance technology and the wider web.

I am not surprised. Google Wave never seemed to have a clear purpose. I remember excitedly waiting for an elusive beta invite, only to experience a huge letdown when I finally tried it. The communication that Wave facilitated was confused and restricted to an elite group. So much for reinventing email.

However, I am disappointed. Google put a lot of hype into Wave, then it stagnated and died. I can see the same happening to Google Buzz. It seems like Google is playing it safe – they haven’t made significant changes to many of their apps in a long time: Google Talk, Voice, and Reader are some significant examples. Gmail hasn’t broken new any ground recently. 7.4 GB of email storage? Yawn – Hotmail and Yahoo offer unlimited storage.

I get the feeling that corporate bureaucracy is starting to slow Google down and is making significant changes in flagship products more difficult.

Come on Google

Toggle Trillian with Caps Lock (using AutoHotkey)

Behold the Caps Lock key, a vestige of a previous era and scourge to the modern user. I never use the Caps Lock key, and I get the impression that most users don’t. Yet it still becomes accidentally activated, producing bothersome effects.

AutoHotkey is capable of disabling the Caps Lock key. AutoHotkey is a tiny program that lets you assign behavior to keystrokes, mouse actions, and more. It is actually very powerful and can run extremely complex scripts, which makes it somewhat intimidating. For these reasons I avoided it, although Lifehacker frequently praised it, until I finally took the plunge. I’ll never go back.

SetCapsLockState, AlwaysOff

Disabling the Caps Lock key is a one liner. But that seems like such a waste of a key; can’t I do something useful with it? Yes I can!

SetCapsLockState, AlwaysOff

CapsLock::
  if (!capsDown)
  {
    capsDown := 1
    Process, Exist, trillian.exe
    if (%ErrorLevel% == 0)
    {
      Run, C:\Program Files (x86)\Trillian\trillian.exe
    }
    else
    {
      IfWinActive, ahk_class TSSHELLWND
        WinActivate, ahk_class Shell_TrayWnd
      IfWinExist, Trillian
        WinActivate
      else
        SendInput, +^{t}
    }
  }
return

CapsLock Up::
  capsDown := 0
  IfWinExist, Trillian
    SendInput, +^{t}
return

This script shows my Trillian contact list while I hold Caps Lock and hides it when I release the key. Now with one keystroke I can easily peek to see who is online and return to my work undisturbed. It even launches Trillian if it is not already running. I greatly prefer this to Trillian’s dock/autohide feature because I was always making Trillian pop open when I didn’t mean to.

If you want to use this script, be sure to set the run command to Trillian’s location on your computer, and assign the Hotkey Ctrl+Shift+T to the action “Contact List: Toggle Visible” (this setting is found within Automation in Trillian’s Preferences).

I’m sure this script could be adapted to toggle other programs and Instant Messengers.

Note: This works on three of my computers running Windows 7 and Trillian Astra, but I imagine it would work with Trillian 3 and other versions of Windows.

GMinder: Now with Better International Time Support

Several users noticed that GMinder did not correctly display dates and times on their computers. This is because GMinder did not take into account various international time formats. New version 1.2.10 now has better support for such formats, including 24 hour formats. Note that GMinder will now use your regional settings in Windows to format the time.

Additionally, there is a new “About GMinder” window that displays the version of GMinder that you are using, accessible from the system tray.

As always, thank you for your suggestions and feedback!

Minor GMinder Update – Connectivity Testing

GMinder trys to ping www.google.com prior to downloading events. If ECHO is disabled on your network (possibly blocked by your admin), then events will not be downloaded even if your calendars can be downloaded. With GMinder v1.2.8, an option has been added to enable/disable the connectivity test. To skip the ping, go into Options and uncheck “Test connectivity before downloading events”.

EDIT: Version 1.2.8 used some faulty logic when deciding if it should ping. It has been quickly replaced by 1.2.9. I apologize for the mistake, please download the new version.

GMinder v1.2.7 – Add Events and Proxy Support

I released a new version (1.2.7) of GMinder today, with the following improvements:

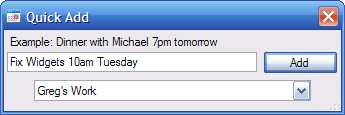
  • Ability to add events to your calendars (Thanks to Dan at rowdypixel.com for getting this started!)
  • Improved Google authentication
  • Automatic proxy configuration
  • “Always on Top” option for the reminder window

The new Quick Add feature
GMinder-Add

I recommend installing this new version, especially if a previous version had given you trouble.

Thank you for all your suggestions and feedback!